Thursday, 2 May 2013

Evaluation

   When I first learnt about this project I thought it would be very much an up hill battle but actually I have quite enjoyed it. Being someone who hasn't ventured far into the gothic/horror genre before it’s been quite interesting to see where I have gone with it, I think that watching the beauty videos helped the most in making me understand how it isn't all about gore, its just about things that seem unsettling/making you feel uncomfortable look quite beautiful in a weird sort of way.
            I have enjoyed learning about how to create cuts and wounds but also experimenting with other products to get similar or interesting new effects, for example with the staple lips I'd created if I had seen that in a magazine or whatever I would have presumed that you needed very specific products but actually I was able to create them using just normal staples, DUO glue and wound filler. I did however find it challenging creating the looks in a fashion way without going either too gory or not showing enough skill, it has definitely helped teach me how to find the line between too much and too little and being able to decide when to stop and leave it at that.
            I’m really pleased with my final images and found it really exciting watching my designs and model choices come together to create what I had in my head. If I had the chance to do the project again I would only change a few things about my looks like backcombing Look 1’s hair and making the drip more prominent but overall I’m pleased!
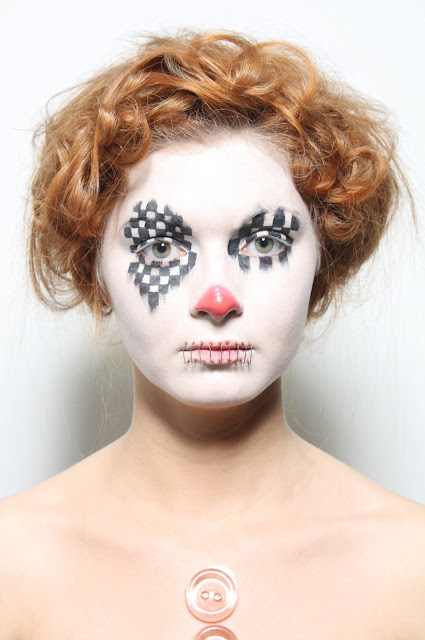
Final Images Look 2


Final Images for Look 1


What Video?

I think my looks would be for a video by CocoRosie  because after listening to and watching quite a few of their videos they seem to go for the same sort or 'Weird/unsettling but beautiful' idea that I have tried to achieve in my looks, combining pretty models with slightly odd in some way looks to create something that is a bit different to just a beauty look.

Model choice

Model choice is always very important but I had quite a clear picture in my head of what my model required from quite early on so I know that without the right model my looks might not look quite as effective as they could.

Look 1: The babysitter

Model: Ellie
Requirements fulfilled: 
     - Long brown hair 
     - Quite petite facial features
     - Good skin 
     - Bluey Green eyes


Look 2: The Clown Statue/Doll

Model: Hannah
Requirements fulfilled: 
     - Red hair (and enough for the style I want)
     - Good face shape (for the look)
     - Good skin 
     - Not too tanned not too pale
     - proportionate facial features


As well as these requirements that they fitted I just also felt that they would work well for the looks.

Styling

Look 1: The Girl

For the styling of the girl I have decided to use the black thick elastic (with a bit of the thin cord too) to wrap around her face and body because it looks the most in proportion and I think the texture looks best. I was able to get the elastic (and cord) cheaply from a fabric shop and bought 5 meters so I could wrap it around my model a few times without being restricted by its length. I also wanted the model to wear a leathery top because it follows my theme, I however couldn't find a top to borrow and the shops only had ones with straps which I didn't want so I decided to buy some black wet look fabric which I will wrap around my model to look like a top.

Look 2:The Clown

Because the make up and fair is the main feature I didn't want to use too much other styling because it would look too much and detract from the main features. The only styling I chose to add for this look is 2 almost clear big buttons to stick on the skin, big buttons are used a lot on clown costumes so I can still add a bit more to the clown look without making them too obvious. Again I bought these buttons from a fabric shop and I will stick them on with DUO glue.

Testing for look 2

I also did quite a bit of testing for look 2 too, I started off by having a play around with a few of my initial ideas for the clown look..


I tried blackened 'abyss' eyes, stapled lips, and what to whiten the skin with. The blackened eyes really didn't work how I wanted them to because they don't look as hollow as I had imagined, they also looked a bit too intrusive onto the face with the other features and it felt a bit OTT, also I imagined that as a statue or doll the clown would be staring at someone so to see it's eyes would be more important than I had first thought. I also tried some stapled together lips which I had seen Caroline Saulnier do a tutorial for something similar on Hunger TV, I used DUO to stick them on a wound filler around the bases for my version. They were a lot easier to do than I thought they would be and they looked pretty effective too so I think I will use that technique in my clown look. For the last of my first bit of testing I just tried out 2 products to whiten the face, I used foundation for one and a type of paint (safe for skin) for the other, although I liked how the paint cracked which might look effective for and old statue or toy I decided it flaked off too easily which would cause me trouble when applying the rest of the make up on top.


Again I did a trial run of the makeup for look 2 before the final shoot and again it brought up things that I now know to alter for the final shoot/look.. one is that I am going to make the squares smaller and also have one side of pattern smaller than the other to add some asymmetrical oddness, another is that I am going to whiten the brows more before applying the pattern so they don't interfere with the squares, I do will however keep the nose and the lip colour the same because I think they look better in this trial than the last.

Testing for look 1

I did quite a bit of testing because I knew there were a few things within my look that would need trialing before the final shoot. I started off by testing out a few products from my kit that I could for the tear drip..
Kryolan Aquacolor (with water), Mac Lipmix and Kryolan Supracolor
I found that the Supracolor looked too painted and not dripped, the Lipmix was just too stiff and so didn't look like it had dripped either, but they both look wet though which is good. I have decided on the Aquacolor because it runs/drips the best/most realistically and still have a good strong colour.
The next thing I considered was what cord i was going to use to wrap around the face/body.. 
Thin cord, Quite thick elastic and White ribbon
I decided that the white ribbon wouldn't look bold enough against such pale skin and I didn't really like it's shine. The thin cord was ok but I would have to use more of it which might look a bit too much/too busy, so I've decided to use the thicker elastic because it looks the most in proportion to the face and also because its elastic it will give the look I want without being too uncomfortable for my model.
I also tested out the make-up part of my look before the final shoot so I could realise any problems that needed sorting out, see how long the look took me and generally practice..


I'm so glad that I did this last test because it brought quite a few things which I wouldn't have realised until too late..
The colours of the purple (shadow) and blue (lashes) didn't pop as much as I wanted them to, so to fix this I am going to both apply more colour/product and make the face a bit paler so that the colours stand out more. I have also decided that I am not going to use as much cord as I was because it just looks too much with lots and I can portray what I want without using as much. 2 other things which are bothering me are the eyebrows and the lips, I'm not sure quite what it is at the moment but I'm just not sure about them so I think I will just have a think and try something  else with them for the final shoot.

Context

Just wanted to write a quick post explaining the thoughts behind my final looks, putting them into context..

For the Girl/Babysitter in the clown statue gothic urban legend I wanted to show how she was trapped and surpressed on the outside from going crazy due to her memories/experiences from the clown but how she was still colourful and her old self in the inside trying to get out, I used a bright colour on the lashes and for the tear drop to show her/the colour trying to get out.
I used the cord to show how she was mentally and physically trapped by her memories, I thought about using all black contact lenses but decided that to see that she was still trapped inside it would make more sense to see her eyes. 
I used a wet look fabric as a top because I wanted something tight, leathery and black because I took slight reference from Bondage clothing because of her being tied up etc and fitted with the monochrome exterior I wanted to create.
The hair was crimped and backcombed to make it look messy on the bottom section as a fashion interpretation of her struggle to get out of cords. 

For the Clown Statue/Doll I decided on a checkerboard pattern on the eyes because it is a common pattern on clowns clothing but a change from the normal black cross or splodge eye in clown make up without straying too far away. It came about because I didn't think just black on the eyes (in the first test) looked very good so I wanted to break it up a bit and so a black and white checkerboard seemed appropriate.
I imagined that the clown was dressed as a clown because it was trying to relive a childhood and chose a clown because it is assumed that most children like clowns but that isn't the case and the staples were frightening so when the children children didn't find him funny he felt he had to kill them. I know a part of my fear of clowns is because you cant see their emotion because its painted on and hidden so that could also be a reason it chose to be like a clown to hide who they actually were.
I wanted to have fairly classic clown curly hair but give it a fashion trist so made it a bit more tousled and messy/fluffy. I also felt like I had to have a red nose (but smaller) on the clown because it is such a significant feature of what makes a clown look like a clown.

Look 2: The Clown Statue/Doll


This is the facechart I will take with me to the shoot so I can complete my look how I require and use the right products etc.

(description)
(why)
(products etc)

Make up-
  • Base - White matte face, only on the face so it looks like a mask (in contrast with the natural skin colour of the body) Standard matte white clown face with a masked look to show that their identity is being hidden - Illamasqua matte primer, Illamasqua liquid white foundation and Illamasqua translucent loose powder.
  • Cheeks - Slight contouring under cheek bones To give a bit of angle/shape to the face without distracting from the main features Illamasqua powder blush in 'Disobey'.
  • Brows - Whited out - to make the face look a bit more odd and so they dont distract from the pattern on the eyes - Kryolan Supracolor in white. .
  • Eyes - Black and white checkerboard pattern (one eye pattern smaller than the other) Reflecting the sort of patterns clowns have printed on their clothes, the pattern also distorts the brow which looks a bit odd Kryolan Aquacolor in black (and an eyebrow brush to 'scratch' the edges of the outer squares)
  • Lashes - Nothing on the lashes because then would be lost in the pattern
  • Lips - Small amount of red smudged out from the inside of the lips, stapled up lips look (in a line across the lips) (including a bit of would where the staples have pierced the skin) Only a small bit of colour to indicate that the lips are there, nothing bolder because it would detract from the staples feature, staples show that the clown can't talk so can only be judged by look, the wound at the base of the staples show the element of pain Kryolan Supracolor in bright red (mixed to a similar colour to the nose), DUO glue, silver staples and wound filler
  • Nose - Bright red end of the nose, brushed upwards - a red nose is a key feature of a clown and it also adds a pop of colour Kryolan Supracolor in bright red (mixed aswell) (brush flicked upwards)
Hair-
  • Front 2.5 inches of hair from hairline sectioned off, loosely curled and then roughly pinned, back section of hair backcombed and then pinned upwards, everything is sprayed with hairspray A more fashion interpretation of the classic clown hair style, bold colour to stand out - Paddle brush, sectioning comb, big salon clips, curling tongs, hair grips, backcombing comb, hair pins and hairspray.

Look 1: Babysitter (After effects)


This is the facechart I will take with me to the shoot so I can complete my look how I require and use the right products etc.

(description)
(why)
(products etc)

Make up-
  • Base - Pale but not completely white matte face and body (parts that will show in the photos) to show the natural skin colour is pale - I wanted the outside of here to be fairly monochrome to show how on the outside it looked like she had gone crazy and was not herself on the outside anymore  - Illamasqua matte primer, Screenface creme foundation, Illamasqua liquid white foundation and Illamasqua translucent loose powder.
  • Cheeks - Slight contouring under cheek bones - To slightly accentuate the cheek bones Illamasqua powder blush in 'Disobey'.
  • Brows - Slightly darkened but not distracting For impact Screenface dark brown eyeshadow.
  • Eyes - Grey purple graduated depth of colour and blended outwards - A dull purple to accentuate the eyes but also as a bold contrast to the lash colour Kryolan Supracolor in purple black, burgundy red and white and Screenface eyeshadow in purple (dabbed ontop to stop the Supracolor from creasing or sliding).
  • Lashes - Light turquoise lashes with a light turquoise tear dripping down - Bright light turquoise to show how her colour/how she used to be trying to burst out of her mental and physical entrapment  - Kryolan Aquacolor in light turquoise (mixed with water into a fairly thick consistency with a little more water for the tear).
  • Lips - Bold slightly glossy black lips - To stand out and also go with the monochrome exterior theme - Mac Lipmix in black or Kryolan Supracolor in black.
Hair-
  • Center parting with the hair slicked down on either side until eyebrow height when the hair is bigger, messier and more textured - The center parting shows the conformity of the entrapment, then the messier section is where she has tried to wriggle out of the cords etc - Paddle brush, comb, brown hair grips, hairspray, crimping tongs, backcombing comb.

Initial Designs For Look 2

 
Again these are a few of my initial ideas for Look 2, I've have tried to play with hair and make up by using my mood board, storyboards and other research for inspiration.

Initial Designs For Look 1

 
 These are just a few initial design ideas I've had so far, I've tried to play with colours and hair styles etc whilst considering how I might achieve them.

Storyboard for Look 2


This is my storyboard for Look 1 for the babysitter in the clown story, it includes..
  • Staples on the face
  • White mask like face
  • Ombre lips
  • Asymmetric eyes
  • Checkerboard pattern (often used on clowns clothing)
  • Red hair
  • Tousled curls
  • Clown nose (but not quite as stereotypical in shape)
  • Detailed pattern around the eyes
  • Staples
  • Fluffy backcombed hair

Storyboard for Look 1


This is my storyboard for Look 1 for the babysitter in the clown story, it includes..
  • Colour pops on a plain face/base
  • Crimped backcombed hair
  • Drips/tears of colour
  • Brightly coloured lashes
  • Ombre lips
  • Drip/tear from the eye
  • Wrapping the body to trap
  • Wrapping the face to distort
  • Center parting 
  • Pale but not white face
  • Weird but beautiful
  • Black lips

Other Research

Hunger TV

Hunger TV - Caroline Saulnier

Hunger TV - Caroline Saulnier

Hunger TV - Ayami Nishmura

I have also looked at clips from 'IT', old 'Freakshow' movies, and some other music videos for ideas and inspiration.

Chosen Gothic Urban Legend

The Clown Statue/The Clown Doll - as told by Tamra S. Dec, 22, 2004

So-and-so's friend, a girl in her teens, is babysitting for a family in Newport Beach, Ca. The family is wealthy and has a very large house — you know the sort, with a ridiculous amount of rooms. Anyways, the parents are going out for a late dinner/movie. The father tells the babysitter that once the children are in bed she should go into this specific room (he doesn't really want her wandering around the house) and watch TV there.

The parents take off and soon she gets the kids into bed and goes to the room to watch TV. She tries watching TV, but she is disturbed by a clown statue in the corner of the room. She tries to ignore it for as long as possible, but it starts freaking her out so much that she can't handle it.
She resorts to calling the father and asks, "Hey, the kids are in bed, but is it okay if I switch rooms? This clown statue is really creeping me out."

The father says seriously, "Get the kids, go next door and call 911."

She asks, "What's going on?"

He responds, "Just go next door and once you call the police, call me back."

She gets the kids, goes next door, and calls the police. When the police are on the way, she calls the father back and asks, "So, really, what's going on?"

He responds, "We don't HAVE a clown statue." He then further explains that the children have been complaining about a clown watching them as they sleep. He and his wife had just blown it off, assuming that they were having nightmares.

The police arrive and apprehend the "clown," who turns out to be a midget. A midget clown! I guess he was some homeless person dressed as a clown, who somehow got into the house and had been living there for several weeks. He would come into the kids' rooms at nights and watch them while they slept. As the house was so large, he was able to avoid detection, surviving off their food, etc. He had been in the TV room right before the babysitter right came in there. When she entered he didn't have enough time to hide, so he just froze in place and pretended to be a statue.
----------------------------------------------
It wasn't easy deciding but in the end I chose The Clown Statue story because I was getting most ideas from this story and the ideas were more interesting too. It also turns out that I'm scared of clowns so I might have a different view of them or might change my opinion of them by the end of the project which will be interesting!

Ideas

Before I settled on an urban legend I wanted to first pick the stories that I was most drawn to and then have a think about what I might do with them, these are the ideas I have come up with -

The fatal hairdo
•Dishevelled beehive
•Bitten and wounded face (near hairline particularly
•Fairly dead looking face with remains of make up

Crazy (the effects of a story)
Maybe whited eyes
Bound up with tape or string
•Frizzy very backcombed hair
•Very pale
•One colour engulfing the eye (white? To merge with the eyes)
Maybe dripping blood

Bloody Mary
•Scraped nail marks down neck and side of face (maybe including the hands with the nails clawing from behind)
Running make eye from being in hysterics
•Hair up so marks are seen

The Clown
Black abyss eyes (closed when photographing)
Maybe blood dripping from the mouth or cross taped in red over the mouth
•Pale face
•Backcombed but clearly sectioned hair 

Moodboard


This is my initial mood board for this project, its a collection of images that I have liked/found interesting from my initial research into the gothic/horror genre. These are a few ideas that caught my attention:

  • Facial features being covered or obscured - this effective because it is uncomfortable to look at something that is heaving distorted or even not there, I particularly think that covering the eyes is unsettling to look at because that's where you mainly look when you're engaging with someone and a lot of expression is shown in the eyes so when that is taken away it makes it you feel uneasy.
  • Using alternative materials - This looks good because for example when you first at the top right photo you just see a big blood splatter but at on closer inspection you see that its actually a blood splatter covered in red jewels so it adds another dimension to the look. 
  • Wrapping/entrapment - its uncomfortable to see someone else struggling to move/be restricted because it kind of makes you think about how horrible it would be to that position yourself.
  • Dripping - its a bit of a classic horror technique because it can look so effective, it might also be interesting to use some other colour/paint rather than blood too.
  • Unexpected elements - like facial hair on women (as pictured) is just generally weird to look at.

Monday, 29 April 2013

Hmmm

I decided to do some general research before getting more specific because I am so new to this genre/style so I wanted to see what was out there and what I liked and didn't like.. after doing this initial research I've realised that I actually quite like some Gothic looks and they are definitely used a lot in fashion. I think that the most important things that I have discovered so far are that the looks are more unsettling than gory or realistic and are often just inspired by one aspect of gothic/horror and are then elaborated on in a more fashion or beauty which is pretty much exactly what we are doing for this project. 
Off to go and ponder on more photos..

Other initial inspirations

I found these photos while browsing for general inspiration on the Twisted Lamb blog, It was interesting to see all the different editorial interpretations of gothic/horror and these were the photos I was most drawn to..
David Galstyan

Adriana Gerasimova
RISE Design Studio
Chris Nicholls
Paco Peregrin

Mert Alas & Marcus Piggott
Fredrik Wannerstedt

Tuesday, 2 April 2013

G(O)OD+(D)EVIL by Chris Turner

CocoRosie - Gallows


I think the dripping featured in this video is effective because it is uncomfortable to look at.

CocoRosie - Lemonade


I was drawn to this video because they combine beauty and a haunting feeling really effectively which is a combination I like. I also think the facial hair on one of the girls is effective because it's a odd to look at and you don't understand why she has it which adds interest to the whole look.

Initial thoughts..

From the person who's only watched about 3 scary movies in their life, one of which I kept my eyes closed for the majority, It's safe to say the gothic/horror genre isn't exactly in my comfort zone! I don't mind gory things so much but I struggle with things that are more realistic in some way so this project is definitely going to be a challenge for me! 
When we were introduced to this new project I found it interesting how much gothic inspired fashion and beauty we are exposed to on a day to day basis for example in music videos etc, it was also explained to us that our looks shouldn't be extreme and should just be uneasy for the viewer to look at, so we have to find that fine line. Despite feeling a little in the deep end I'm quite excited to see where this project takes me!